How to stop Windows 10 auto updates
We can stop or prevent windows 10 from updating windows using the windows update. Sometimes if you have got issues with your computer maybe got a driver issue or piece of hardware and it wants to run download a patch or something from the internet from Microsoft update center what happens is sometimes that patch might not be compatible with your computer with something.
Windows 10 is a most latest service in Microsoft service, which means Microsoft has set the new operating system to automatic updates are turned on by default and your PC always receive new update with the latest and best features. With windows operating system, automatic updating, you don’t have to download latest version of windows from the internet. Windows update automatically install in your PC when important updates as they become available.
But some of the users do not like automatic updates. They will not want to automatic updates as it might take up system and network resources when they are doing critical work.
In the previous versions Windows XP, Windows 7 and Windows 8.1, Microsoft will be an option for users to turn off auto updates completely. But Unfortunately in Windows 10, Microsoft will not be an option for users to turn off auto updates.
In this article we will with the two approaches to disable the automatic updating within the windows 10 operating system.
Method 1: Windows Professional
This approach will only apply to with a windows professional.
1. Select Windows key + R, type mmc (Microsoft Management Console) then press ok button.

2. Under Microsoft Management Console click on the file on the left then click on Add/Remove Snap-in.

3. Under Add/Remove Snap-in double click on the Group Policy Object then click Finish button for the local computer and then click the ok button.

4. After complete this process, click on OK button. Then automatically create a new folder Local Computer Policy.

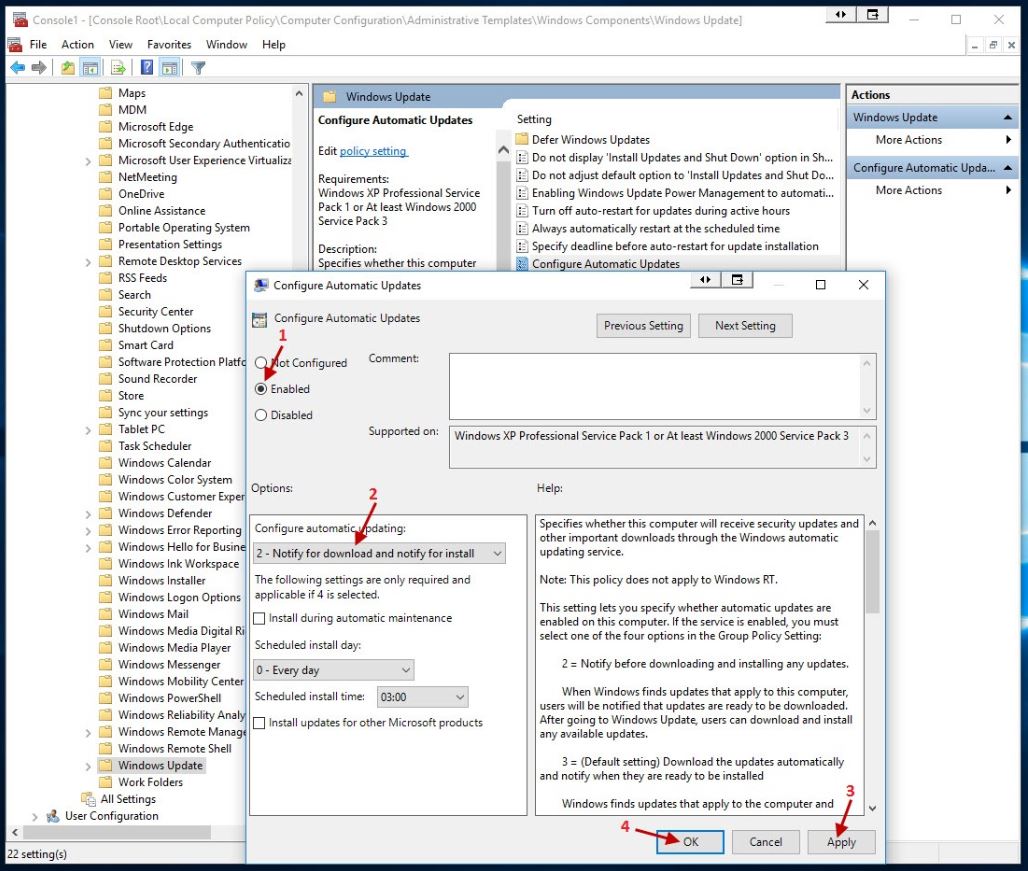
5. Expand Local Computer Policy-> Computer Configuration-> Administrative Templates-> Windows Components-> Windows Update then double click Configure Automatic Updates.

6. Under Configure Automatic Updates select Enabled button, select 2 – Notify for download and notify for install click Apply and OK button.

7. Now Configure Automatic Updates is Enabled.

Method 2: windows home and professional
This approach applies to windows home and windows professional.
1. Go to search button and search Control Panel.

2. Control Panel->Administrative Tools then double click Services button.

3. Scroll down and find out Windows update and double click Windows update button.

4. Select Disabled button from Startup type. Click Stop button then click Apply and OK button.

5. Now automatic Windows Update disabled.

Now restart your system for this setting to take effect right, it will not take effect until you restart your system.


No comments